Servings: 4-5 biscuits / Prep Time: 10 minutes / Bake Time: 12-14 minutes
This small batch biscuit recipe is designed for two people and makes 4-5 buttery, flaky biscuits. Made with simple pantry ingredients and whole milk (no buttermilk needed!), they come together in about 25 minutes; no leftovers, no waste!
Baked until golden brown with slightly crispy tops and soft, fluffy centers, these biscuits are at their best when they’re fresh and warm from the oven. They’re perfect for a cozy breakfast with small batch sausage gravy for two, served with a warm bowl of soup, or simply split open with some good butter and jam.

Ingredients for Small Batch Biscuits
- 1 cup All-Purpose Flour
- 1 tsp. Baking Powder
- 3/4 tsp. Kosher Salt (or 1/2 tsp. fine salt)
- 1 1/2 tsp. Granulated Sugar
- 3 tbsp. super cold Unsalted Butter
- 1/2 cup super cold Whole Milk

Ingredient Notes + FAQs
- Kosher Salt: I use Diamond Crystal Kosher Salt in all of my recipes. If you’re using a fine sea salt or table salt, decrease the amount to 1/2 tsp.
- Baking Powder: Make sure it’s fresh!
- Unsalted Butter: Again, just my go-to for everything.
- Can I use salted butter? Yes, but decrease the salt by just a hair.
- Whole Milk: I don’t recommend swapping this with any other type of milk. It’s the best fat percentage for great flavor! You can swap in 2% milk if needed; note that using a lesser fat milk may create denser biscuits.
- Can I use buttermilk instead of whole milk? Yes! Just do a 1:1 ratio swap with the milk.
- Can I double this recipe? Absolutely! There is a slider bar down in the recipe card to increase the amount you need. If you like the tang of buttermilk but don’t have any on hand, add a little squeeze of fresh lemon juice to the milk.
- Why are my biscuits flat? If the butter gets too warm, they won’t rise. To make the best biscuits, use SUPER cold butter, fresh baking powder, and pop the unbaked biscuits into the refrigerator while the oven heats up if you’ve got the time. Or if you twisted the biscuit cutter when forming the biscuits, it can seal the edges of the biscuit and keep them from rising.
Why These Biscuits for Two Work
- Cold butter creates steam pockets for fluffy + flaky biscuits.
- Minimal mixing keeps them tender!
- Whole milk gives them rich flavor without needing buttermilk.
- Small batch biscuits means 4-5 fresh, hot, homemade biscuits with minimal leftovers. 🙂
I always have whole milk on hand for coffee, so instead of buying buttermilk just for biscuits, I wanted to create a really flavorful, tender biscuit with what’s already in the fridge. Whole milk keeps them tender, simple, and flavorful. There are just six ingredients, plenty of flaky layers, and zero fuss with this recipe. Love that. 🧡
How to Make Small Batch Biscuits
Step One: Preheat the oven. Preheat the oven to 425ºF (220º C). Line a rimmed baking sheet with parchment paper and set aside. (I love this quarter size baking sheet!) (If possible, pop the butter in the freezer for about 15 minutes while you wait for the oven to preheat.)
Step Two: Combine Dry Ingredients. In a large mixing bowl, whisk 1 cup All-Purpose Flour, 1 tsp. Baking Powder, 3/4 tsp. Kosher Salt, 1 1/2 tsp. Granulated Sugar together until combined.

Step Three: Add Butter. (There are three ways you can do this).
- With your hands: Cut 3 tbsp. super cold butter into 1/2″ cubes, then add them to the bowl. Use your hands or a pastry cutter to crumble the butter into the dry ingredients, forming a coarse crumb.
- With a box grater: Use the large holes of a box grater to grate the cold butter into the flour mixture, then stir it in.
- With a food processor: Pulse the dry ingredients and cold butter cubes 5-6 times, until the mixture resembles a coarse crumb (only tiny pieces of butter are left).


Step Four: Stir in the Milk. Using a fork, gently stir in 1/2 cup cold Whole Milk until a rough ball of dough forms. (Add another tablespoon of flour if the dough seems too wet).
Step Five: Form the Layers. Turn the rough dough out onto a very well-floured surface. Gently form it into a rectangle that is about one inch thick. Fold the front half of the rectangle onto the bottom half, and gently pat down again. Fold the dough in half again, but this time fold the right side onto the left side. (This is how we create the layers!)


Gently repeat the folds again. (Fold in half from front to back, gently pat down, then fold in half from side to side.) Gently form the dough into a rectangle that is about an inch thick.


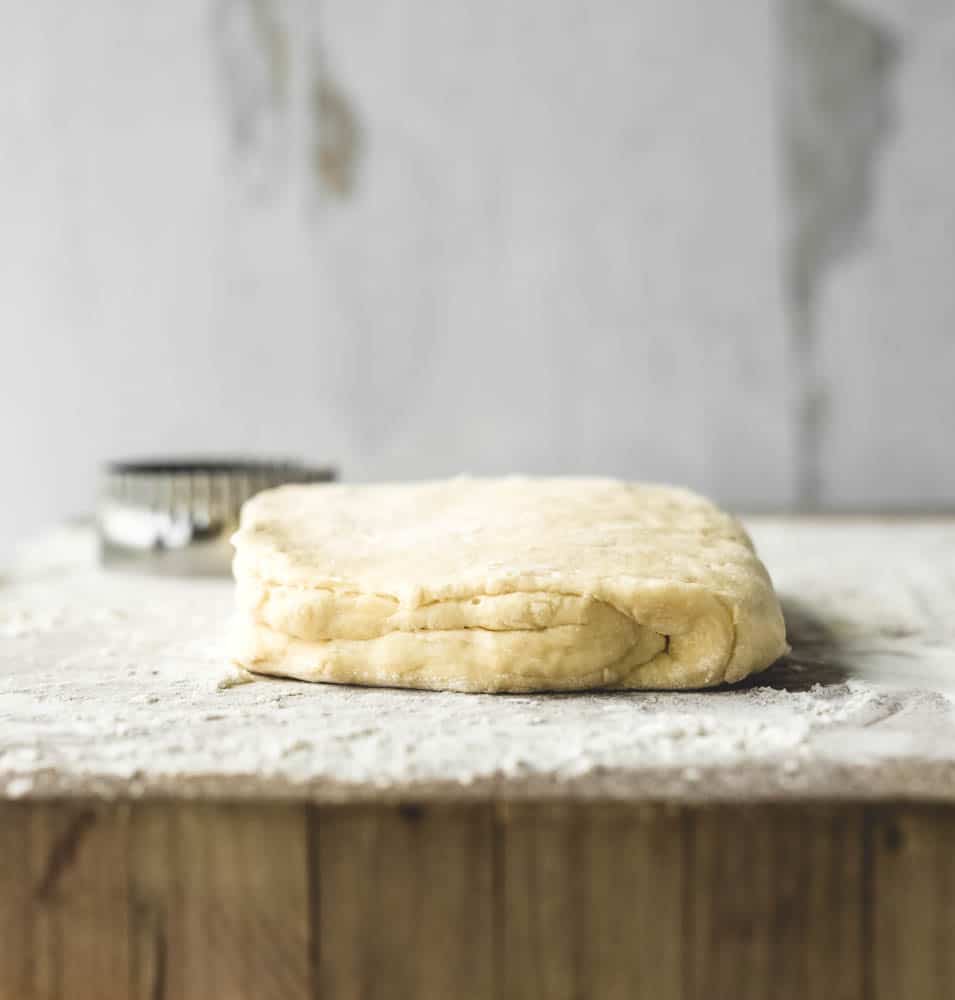
Step Six: Form the Biscuits. Dip a 2″ biscuit cutter into a little bit of extra flour. Cut two biscuits from the dough, firmly pressing down as you cut. Don’t twist the cutter, but you can gently wiggle it back and forth to free the biscuits from the dough. Gently form the remaining dough into another one inch thick rectangle, and cut out the third and fourth biscuits. Place the biscuits about 1/2″ apart on the prepared baking sheet. (If you have ample excess dough, gently mold it together to form another biscuit.)
Step Seven: Bake the Biscuits. Bake the biscuits at 425º F (220º C) for 12-14 minutes until the tops and golden brown and crispy.
Enjoy! Remove the biscuits from the oven, let them cool until they’re easy to handle, and enjoy!
You can use a biscuit cutter to make five round biscuits, or you can simply cut the layered dough into quarters to create four rectangular biscuits. It’s been done both ways, and they’ll be flaky and tender no matter what!
If you make them early in the morning and won’t serve them for a couple of hours, just keep them in a warm oven until ready to serve. (Heat oven to 175ºF (80º C) or “keep warm” setting , loosely tent the biscuits with foil, and keep them warm.)
Recipe Tips & Tricks:
- Keep everything COLD. Cold butter = flaky biscuits! If your kitchen is warm, pop the cubed butter in the freezer for 10-15 minutes before mixing.
- Don’t overwork the dough. Mix everything until just combined; the dough should be a little shaggy. (This helps them stay tender; overworking dough can make them dense.)
- Pat the dough, don’t roll it. I know I used the word “gentle” like 4,285 times in the recipe, but it’s because I mean it. 😅 Be gentle, pat the dough with your hands, be nice to it. This keeps the layers intact.
- Don’t twist the biscuit cutter. Twisting the cutter seals the edges of the biscuits and prevents them from rising. Firmly push the biscuit cutter into the dough, gently wiggle the cutter it back and forth a few times to loosen the cut shape if you need to.
- Bake them close together. For crisper edges, space the biscuits out about 1/2″ from each other. For softer edges, place the biscuits just barely touching on the baking sheet.
Make these Biscuits Yours:
- Add flavor like shredded cheese or herbs! Or use this REALLY easy Cheddar Chive Drop Biscuit Recipe for a different kind of biscuit with tons of flavor. (It’s also a small batch biscuit recipe!)
- Make them sweeter by adding another 1/2 – 1 tsp. sugar and brush with honey butter after baking.
- Use them for mini breakfast sandwiches by slicing them while they’re warm, and placing a small fried egg + halved bacon strips inside!

What to Serve with Homemade Biscuits
So many things. 🙂
- Easy Sausage Gravy for Two
- Homemade Beef + Black Bean Chili for Two
- Creamy Chicken Pot Pie Soup for Two
- Your favorite local jam or butter.
- Eggs, bacon, and love.
How to Store Leftovers
In the refrigerator: Let the biscuits cool completely, then refrigerate biscuits up for to one week by keeping them in an airtight freezer bag.
In the freezer: Let biscuits cool completely on a wire rack. Tightly wrap the biscuits in heavy duty aluminum foil, then place them into freezer bags and remove all of the air. This helps protect the flavor and texture when you’re ready to reheat them! Freeze for 2-3 months.
If you make these biscuits, I’d love to see them! Tag me on Instagram so I can cheer you on, and feel free to email me anytime if you have any questions! I hope you enjoy all of the warm, flaky goodness. 🙂
xx Sara

Small Batch Homemade Biscuits for Two
Ingredients
- 1 cup all purpose flour plus extra for dusting and cutting
- 1 tsp. baking powder
- 3/4 tsp. kosher salt (or 1/2 teaspoon other salt)
- 1 1/2 tsp. granulated sugar
- 3 Tbsp. cold, unsalted butter
- 1/2 cup cold, whole milk
Instructions
- Preheat the oven to 425 F. Line a small baking sheet with parchment paper.
- Whisk the dry ingredients together in a large bowl.

- Cut the cold butter into 1/2" cubes, then add them directly into the dry ingredients. Use your hands to crumble the cold butter into the dry ingredients, forming a coarse crumb.**

- Using a fork, gently stir in the whole milk until a rough ball of dough forms. (Add another tablespoon of flour if the dough seems too wet).
- Turn the rough dough out onto a very well-floured surface. Gently form it into a rectangle that is about one inch thick. Fold the front half of the rectangle onto the bottom half, and gently pat down again. Fold the dough in half again, but this time fold the right side onto the left side. (This is how we create the layers!)

- Gently repeat the folds from the last step. (Fold in half from front to back, gently pat down, then fold in half from side to side.) Gently form it into a rectangle that is about an inch thick.

- Dip a 2" biscuit cutter into the extra flour. Cut two biscuits from the dough, firmly pressing down as you cut. Don't twist the cutter, but you can gently wiggle it back and forth to free the biscuits from the dough.

- Gently form the remaining dough into another one inch thick rectangle, and cut out the third and fourth biscuits. Place the biscuits about 1/2" apart on the prepared baking sheet.***
- Bake the biscuits at 425 F for 12-14 minutes until the tops and golden brown.
- Remove from the oven, and let the biscuits rest until they are cool enough to handle. Enjoy!


Notes
***If you have ample excess dough, gently mold it together to form another biscuit. >>Refrigerate biscuits up for to one week by keeping them in an airtight freezer bag. >> TO FREEZE: Let biscuits cool completely on a wire rack. Tightly wrap the biscuits in heavy duty aluminum foil, then place them into freezer bags and remove all of the air. This helps protect the flavor and texture when you’re ready to reheat them! Freeze for 2-3 months.
- The butter needs to be VERY cold. If you are not immediately mixing the cubed or grated butter into the dry ingredients, keep it in the freezer until you mix it in. Additionally, if you aren’t immediately baking the biscuits once they are made, keep them in the refrigerator until you bake them.
Nutrition
Tried this recipe?
Make sure to follow on Pinterest @aflavorjournal and on Instagram @aflavorjournal


Comments & Reviews
I have made these twice now. They are very delicious, however I have found the need to add a whole stick of butter for a double batch instead of 3 quarters, and I used salted butter and reduced the salt in the recipe. I also used coconut flour for the surface flour. Do not try to sub any coconut flour in the actual mix though! Haha.
Thank you for the recipe!
Love these!! This recipe is perfect for Saturday morning quick biscuit recipe. It’s so easy and delicious. Thank you.
Thank you so much for making them! I’m so glad you love them!!
I have made these twice now. They are very delicious, however I have found the need to add a whole stick of butter for a double batch instead of 3 quarters, and I used salted butter and reduced the salt in the recipe. I also used coconut flour for the surface flour. Do not try to sub any coconut flour in the actual mix though! Haha.
Thank you for the recipe!
Thank you for the comment and the tips, Miranda! I’m so glad you think they’re delicious! <3
Made these last weekend for a breakfast with your sausage and gravy. Both are really good and we ate them all. Thank you for the recipe
So glad you enjoyed them, Jim!! Thank you for the kind comment!
These are perfect!! They are wonderful with egg and cheese. My family requests these every Saturday and Sunday now. They are so quick and easy. This is my go to biscuit recipe. Thank you so much.
This totally makes my day, Bobbi! I am SO happy that you and your family enjoy these biscuits so much! Thank YOU so much for taking the time to leave such a lovely comment!
I just made these again. I don’t think my family will ever get tired of these biscuits. I can see my son making these for his family one day. It’s just so exciting to have found such a great recipe. The layers are just amazing. Again.. Thank you so much Sara 🙂
Bobbi, you have no idea how much all of this means to me! This is the highest compliment you could ever give, and I cannot thank you enough. I hope your son carries on the tradition of making these biscuits, too! Thank you SO, SO much for taking the time to stop back by and leave such a wonderful comment. I love that you’ll continue to enjoy these biscuits on the weekends!! Thank YOU! <3
Tried this recipe 3x, too wet, dense and didn’t work out at all.
Hi Ash! I feel terrible that you had that experience. It sounds like your butter got too warm, which results in it melting into the dough too quickly and causing a dense biscuit. I would recommend making sure your butter is as cold as possible before cutting it into the dry ingredients. I always pop mine in the freezer for at least 30 minutes before using it if I’m mixing it in by hand, but you could also grate frozen butter into a bowl and keep it in the freezer until you’re absolutely ready to mix it into the dry ingredients. Also, be sure to immediately make biscuits and pop them into the oven once the butter is mixed in. If you let the butter OR the dough sit out for too long (especially with these summer temperatures), the butter will become too soft and your biscuit won’t bake properly, which can lead to a denser texture. I hope this helps! Also, the dough is very shaggy after you initially mix it together. In the recipe, I do recommend adding some flour one tablespoon at a time if the dough seems too wet … and to also heavily flour your work surface, so more flour will be incorporated into the dough as you create the layers. And for the final part of trying to troubleshoot – I assume you meant that you tried it three times by the “3x”, but if by “3x” you meant tripled the recipe, I wouldn’t recommend going that route! This recipe is specifically for a small batch of biscuits. I sincerely hope these tips help the recipe work for you if you try it again!
Sara
YUMM!!
Made these VEGAN by swapping the butter out for vegan butter (I used earth balance butter sticks) & the milk out for full fat coconut mylk which was chilled in my fridge beforehand. Also make sure before you open the can from the fridge to give it a good shake so that the fat & water separation can combine again.
You CANT taste the coconut mylk flavor at all!!! I also added a little more butter about 1/2 a tablespoon more but I probably didn’t have to.
I read someone else comment about swapping the flour that they put on the table with coconut flour and I did the same.
These came out fluffy and perfect. 10/10 will make again!
I LOVE your vegan swaps, Lauren! I’m so, so glad you enjoyed them – I just saw them on Pinterest & they look incredible!! Thank you SO much for taking the time to comment, and I I’m so happy that you loved them!
Oohhh you caught this hoe using your recipe for her own lol get her
These biscuits are so delicious. I’m baking my second batch right now for dinner. Thank you.
Thank YOU for making them, Valerie! I’m so glad you like them!
Hi Sara, thank you for this recipe! My biscuits had a great texture and delicious flavor. However, the tops remained very pale and only browned slightly around the edges, even when I baked them for the full 14 minutes, whereas the bottoms became sufficiently brown. I didn’t want to keep them in the oven longer because I didn’t want the bottoms to burn. Do you know why this could be happening or have any tips to get that nice golden-brown color? Should I brush the tops of the biscuits with something (egg wash? Butter?) before putting them in the oven? Thanks again!
Hi RIiley! I’m so glad you enjoyed these!! I would try brushing the tops with melted butter and see if that gets you the golden brown tops next time. Sometimes the size / color of the baking sheet can also impact the browning of the top of the biscuits, too. If possible, try to use a light-colored baking sheet that’s about the size of a quarter-sheet-pan (13″ x 9″). This way, the air can circulate around the pan easily, and hopefully help the tops brown and bottoms evenly! Dark colored baking sheets absorb more heat, which can toast the bottoms of the biscuits faster than the top. I don’t think this part sounds like a factor for your biscuits, since the bottoms didn’t cook too quickly, but just another quick note that hopefully helps guarantee the best & most beautiful biscuits. But definitely try the melted butter on top, and a smaller sheet pan (if you weren’t dong that already – which you could have been!) I hope this helps!!
the only biscuit recipe that worked 100%.
I popped the butter/flour mixture in the freeze while i tidied up so the butter didn’t get soft on me.
I also melted some butter to brush on top for the last minute ti get that golden top.
I want to make a big ol batch of these to freeze. I saw one girl did a whole stick of butter for double batch. Any other recommendations?
The ingredients should be okay to just double! I unfortunately haven’t tested it beyond doubling the recipe 🙁 – but a couple of double batches should work perfectly! There is one reader who said she doubles and sometimes triples the recipe, and it works out great for her!
I’ve made these several time now and they are fantastic! I’m wondering if I can flash freeze the biscuits as dough but already cut into biscuit form before baking?
I’m so happy that you enjoy them, Lindsey!! 😍 you can totally freeze the biscuits before baking! I would just cut them out, place them on a baking sheet with parchment paper, and cover them with plastic wrap before freezing. Once they’re solid, you can transfer them to a zip top bag! To bake them, just put them onto a parchment-lined baking sheet, then directly into a 425 degree oven (still frozen), but bake for about 18-20 minutes total. I hope this helps!!
I’ve made these four times and they’re SO good. I love that I can make a small batch in my toaster oven without heating up my kitchen. I read Riley’s comment about the tops being pale and I’ve experienced the same thing. However, the biscuits are fully cooked, flaky and delicious. Thanks for sharing this easy recipe!
Thank you so much for letting me know, Pam! I’m so glad you love them!!
These biscuits are fantastic! They are easily the best I’ve made. I love to bake, but a really good biscuit has been somewhat elusive. This small batch was perfect for my husband and me.
I’m SO glad that you enjoy them so much, Kristi!! Thank you for the awesome comment!
I baked these this morning. Recipe worked well for me since I could not make biscuits flaky before. Texture: are they supposed to be crunchy when you bite into them? My husband loved them. We ate them with butter, apple butter and raspberry jam. Delicioso. Thanks, God bless
I’m so glad you and your husband enjoyed them! The tops and bottoms of them will be a little crispy when you bite into them, for sure. The inside should be fluffy though! Your toppings of butter, apple butter, and raspberry jam definitely sound delicious!
Just baked these biscuits and they were delicious. I will keep using this recipe. Thank you so much.
I’m so happy to hear that you enjoyed them, Joyce! 😍 Thank you for taking the time to comment, and I’m so happy to share the recipe with you!
I’d almost given up on making good biscuits. Simple recipe that turned out wonderful. I put the biscuits close together and they had slightly crispy outside. Love the layers. Thanks!
I’m beyond thrilled that you loved the recipe, Julie!! Definitely glad you didn’t give up quite yet – I hope you keep on enjoying the recipe, and I’m just so happy to provide you with one that works!!
I’ve made these so many times so I needed to tell you! These are very flaky and perfect every time I make them and they’re definitely my favorite biscuit recipe for two people after I’ve tried a couple of them! Thank you for the recipe and we love them a lot!
I’m so glad you enjoy them, Kris!! Thank you for taking the time to comment!!
Can I use 2% Milk instead of whole milk
You can! The texture won’t be quite as fluffy, and the flavor won’t be quite as rich – but it will work!
It’s not often that I leave a comment, but this recipe calls for one! I have tried numerous recipes in my search for the perfect biscuits, most were flops. I made these this morning and they are DELICIOUS! Absolutely amazing, and I can’t wait to make them again! I can’t get over how light and fluffy they turned out. Thank you for sharing!
Thank YOU for taking the time to leave such a wonderful comment, Niki! You’ve absolutely made my week – thank you again!! I so, so happy to hear that you loved them!! 🥰🥰
can you use 1% milk? Also, what would change in the recipe if I used self rising flour?
You can use 1% milk! The texture may change slightly considering there is less fat in 1% milk, but the fat content of the butter should still contribute to the flavor of these biscuits. And if you’re using self-rising flour, I would reduce the amount of baking powder and salt – probably just use 1/2 tsp. of baking powder (just to be safe), and 1/4 tsp. of salt. I hope this helps!
Oh my gosh Sara! These are so so amazing and so easy to make. While I was making it, I was very unhopeful because I thought I did a lot wrong, but they turned out literally perfect. Such an amazing, easy recipe. Thank you so much!!!
Yay!! I’m SO glad they turned out perfect for you, Anni!! You’re so welcome!!
Perfect every time. I don’t drink milk but always have almond milk on hand still delicious. Thanks
I’m so glad you like them, Cat! And thank you for the note on almond milk — that’s so awesome to hear!!
Helps if everything is cold when mixing. I put flour and sugar and salt in the fridge to get cold before mixing in butter. Works grear
Helps if everything is cold when mixing. I put flour and sugar and salt in the fridge to get cold before mixing in butter. Works grear
Sara, I have made these twice now. I love how flaky they are. However, I am still getting a raw flour taste. The second batch was definitely better. I admit I’m new to biscuits, but am I just not needing them enough? I flipped and folded at least 4 or 5 times. I am so worried about over kneading, It’s all they ever warn about, over kneaded tough doughs….
I’m so glad you love how flaky they are, Chandra! I would try to mix the dough together just a bit more before flipping and folding it; I think the flour taste comes from some of the flour not being totally mixed in. You are totally right about not wanting to overmix the dough though – it’s a delicate balance! As long as you don’t see any excess flour in the dough, you should be set. I would also brush off any excess flour from the biscuits before baking them, too! I hope this helps!
I love how flaky they are. However, I am still getting a raw flour taste. The second batch was definitely better. I admit I’m new to biscuits, but am I just not needing them enough? I flipped and folded at least 4 or 5 times. I am so worried about over kneading, It’s all they ever warn about, over kneaded tough doughs….
Made these just for myself this morning and I must say they are delicious. And since I’m a one person household I have leftovers to eat with the spicy plum jam in my fridge. Don’t hold back the good things just because you’re a “one” !!!
👏👏 you are amazing, Carol! Never hold back on the good things! I’m so glad you enjoyed the biscuits, and I need to find some spicy plum jam for my next batch! 😍
Perfect biscuits 👌
Thank you, Ida! I’m so glad you enjoyed them!
Really enjoyed these biscuits.
I’m so glad you enjoyed them, James! Thank you for taking the time to comment!
These are the best biscuits I have ever made! Thank you! I’ve always struggled to make good ones so I rarely did. Gave it a try again with your recipe, and I’m so glad I did. Some of the best biscuits I have ever even tasted, and I’m grew up on them in the south, so I’ve had a LOT of biscuits. Thank you again! P.S. My Italian husband really likes them too. He doesn’t have any to base it off of except the not so great ones I’ve made, but he said for me to not to lose the recipe. 😂 Biscuits are just a lot different from anything he is use to. I did fuss at him for cutting them like a loaf of bread from top to bottom in slices instead of eating it in bites or just horizontally. Just to be clear I did make them like normal round biscuits so I’m really not sure why he would cut them like a loaf. 😂
And just in case anyone else is in Italy making these, I used lievito istantaneo per pizzaiolo, torta salata, e piadine. There isn’t just one baking powder here.
Your comment COMPLETELY made my day, Nikki!! 😍 and I honestly lol’d at the end 😂😂 I’m SO glad that you both loved the recipe, and it seriously means so much that you took the time to let me know. Thank YOU for making them, and I’m so happy you have a go-to recipe now!! (still laughing btw – now I want to cut my next back into little slices, too 😂)
These biscuits are amazing!! Even my boyfriend loved them and he’s not even into bread…well at least not like I am. Then again, who is?…but I digress. Loved the texture, the flakiness, and I took your advice to another reviewer about adding melted butter on top and that helped with the color. Thank so much for posting!
I’m SO glad you both enjoyed them, Kim! I certainly share your love of bread, so I totally get it!! lol. So glad the melted butter helped with the final color – thank you for trying them out, and thank you for taking the time to comment, too!
This was TOO good. This was so simple, took no time at all and the best part was eating one fresh out of the oven! These will be the new biscuit for anything that calls for them!
I made sure to post on Instagram, so good I was unable to keep this to myself!!
I’m so glad you loved them, Courtney!! Thank you SO much for taking the time to leave such an awesome comment and to share them on Instagram, too!!
Thank you. My hubby has been wanting biscuits and this was perfect for him. Easy to follow directions.
You’re so welcome, Diane! I’m so happy that you both enjoyed them!
I’ve made these twice now and they’re so delicious! The first time, I didn’t have a biscuit cutter and used a coffee cup to cut them out. I was concerned they’d be too big or bake up wrong but they were great; it made three large biscuits. The second time I used a proper biscuit cutter. They’re so good with apple butter! Thank you for the recipe.
Your coffee cup move is next level – I love it!! You’re so welcome for the recipe, thank you for trying it!!
Can I use buttermilk?
Thanks
Hi James! I have not tested this recipe with buttermilk, unfortunately. The whole milk and the baking powder usually work best together, but you should be able to use buttermilk if you need to. The acid in the buttermilk may react differently to the baking powder, and could create a different (less flaky / maybe a little flatter) texture in these biscuits, but they should still taste great! Let me know if you try it!
I was craving a quick snack and these were perfect with warm milk at 10pm! Wouldn’t change a thing about the recipe.
I’m so glad you liked them, Ana! Thank you so much for making them!
I love this recipe, I made these this afternoon. I used my favorite whole wheat flour and was hoping they would turn out…they’re delicious! I appreciate your small batch recipe! Your instructions were clear and the photos helped explain the folding.
I’m so glad you liked them, Autumn! And that they worked so well with your whole wheat flour! 😍 I’m also so happy that the instructions and photos helped out, too! Thank you!
I’m battling high cholesterol, so subbed butter flavor crisco (froze it) instead of butter, placed my flour in freezer, cut salt slightly and added just a bit more sugar def my go to.
I have made these so many times now, and they are my go to biscuit recipe! Fluffy, tasty and perfect every time. Thank you!
Absolutely scrumptious. I used your mini processor suggestion and these turned out to be the best biscuits I have ever made. What a great recipe and helpful suggestions. The soft and crispy and buttery taste are the perfect combination. … I also used your suggestion of kosher salt. That was an amazing and tasty 😋 little surprise Yummy. Definitely made a sunshiny day.
I’m so glad you liked them, Grace! Thank you so much for making them, and for taking the time to leave such a lovely comment! 😍
These are excellent biscuits! I have avoided making them because I don’t want so many leftovers. These are the perfect amount and they are delicious.
Thank you so much for making them, Sherri! I’m so glad you like them!!
These are easy and delicious. One change I made was bake at 400 degrees because the parchment paper I buy is good up to that temperature. Definitely like the melted butter on top too before baking and after.
Thank you for making them, Mrs. Belton! I’m so glad you like them!
I haven’t made biscuits in a long time and had lost my original recipe. Found yours and tried it. I used a whole stick of grated frozen salted butter and 2% milk and the same amount of salt. They came out slightly crispy on the edges and had a soft center. They had a very buttery taste. My oven actually needed an extra 8 minutes but they were delicious! Will be making again. Thank you 😊
Thank you so much for making them, Christie! I’m so glad you like them!!
Can you sub buttermilk for the whole milk?
That should work!
Best biscuits ever.
I’m so glad you like them, Julie! Thank you so much for making them!
This is my go-to biscuit recipe! I’ve been making them for the past three + years for me and my husband, they always turn out great and I’ve even doubled or tripled the recipe to make more for guests and it worked beautifully. Thank you so much !
Thank YOU so much for making them so often, and for taking the time to leave such a wonderful comment! I’m so glad you both like them! And love that you’ve doubled & tripled the recipe with success. Thank you again!
10/10 recommend! I’ve never made homemade biscuits before, and this recipe knocked it out of the park! With it being my first time, I didn’t want to potentially waste a bunch of ingredients if it was a flop, so this was perfect. Thank you for sharing!
Thank you so much for making them, Amber! I’m so glad they were perfect for you!!
I followed your recipe, but added cheddar cheese. Why did the butter leak out the bottom of my biscuits?
Hi Laura! Sounds like your butter got too warm before the biscuits went into the oven. Make sure the butter is SUPER cold when you mix it into the dough, and you can even pop the cut biscuits into the refrigerator for a few minutes before baking to make sure the butter stays cold!
I just finished my first quarter in an 18 month culinary program I enrolled in and this quarter involves baking which I’m terrible at ! I tried making country biscuits and it was an epic failure so I’m going to try this recipe. Any baking recipes and or tips you can provide would be helpful indeed.
My biggest tip for this specific recipe is to make sure your butter is super cold! Otherwise, don’t overthink it, or overwork the dough – just have fun with it, keep the butter cold, and try it out. You’ll become great once you get the hang of everything!
Made these for the first time tonight to compliment my homemade vegetable soup. I wanted to make just enough for my husband with no left overs. WOW….they were so good !!! Thumbs up from my husband and I have replaced my old recipe with this one. Thanks!!
Thank you SO much for making them – and for such an incredible compliment! I’m so glad you both enjoyed them!!
These were so yummy and easy to make! Thank you for sharing the recipe!
Thank YOU for making them! I’m so glad you liked them!
I make this recipe on repeat and they turn out great each time. Lately, I’ve gotten lazy and I make them as drop biscuits. Thanks!
Ohh I love the drop biscuit route! So glad that you like the recipe – and thank you for taking the time to comment! 🩵
These are so simple to make and taste fantastic without the need for buttermilk!!
Thank you for making them!! So happy that you liked them! 💕💕
I love these little biscuits! I bake then in a 6″ cast iron skillet. In order for them to fit I cut them thick, so there’s fewer biscuits, but they’re nice and tall. They are placed in the pan touching sides, so they rise up. I follow the recipe as written, but add 1/4 tsp of cream of tartar. I use a 1.5″ biscuit cutter. So cute, and delicious!
I’m so glad you love them – and I really like your changes!!
Oh these are so good, easy, and just what I was looking for. Perfect I used my grater on the butter worked out well. It’s now my go to biscuits
Absolutely the BEST small batch recipe. Every review should have FIVE STARS!!! Amazing flavor and super easy. Thank you!
Yaaaay! Thank you SO much for making them!! And for taking the time to leave such an incredible comment!!
This biscuit recipe is excellent. I have used it more than a dozen times and the ingredient portions seem right on. I usually get four 3″ biscuits with a mini as a snacking biscuit for later.
Thanks for this recipe! I usually make the Budget Bytes 5-ingredient freezer biscuits, but I had a sudden urge for biscuits and didn’t have whipping cream on-hand. These turned out great! Nice to just make enough for today, and a smaller amount of clean-up. I didn’t have whole milk, but I had Carnation instant nonfat dry milk which I mixed with ice cold water and a few tablespoons of sour cream. It worked for me! Nice to not have to run to the store 🙂
I LOVE your substitution for the milk! And thank you so much for making these – so glad you enjoyed them!! And I hear you on saving a run to the store – that’s always a win! 🤣
My husband and I thought we weren’t biscuit people…
I’m making my third batch this week. I stumbled upon this recipe when I was wanting a quick, easy, bread to pair up with my breakfast platter craving.
These biscuits took us by surprise. So simple and delicious.
I LOVE to hear this!! Thank you so much for making them – I’m so happy to hear that you and your husband enjoy them so much!!
The little batch of biscuits were perfect! Had them this morning with homemade blueberry jam and fig jam. To brown the top some just before they were done added a brush of butter to them worked great. Will Definitely use this recipe alot!
Thank you so much for making them, Cassie! Love that you brushed butter on top before baking them, and that you enjoyed them!!
Perfect recipe to make biscuits for two. It seemed too simple to be true… but came together in no time and baked up light, fluffy and buttery. Thanks for sharing this recipe… it’s a keeper!
Thank you so much for making them, Jenn! I’m so glad you liked them!!
I cannot recommend this recipe enough. I’ve made it three times so far and it’s always a hit with the family!!
LOVE to hear that, Sophie! Thank you so much for making them!!
Made these today for the first time. The only change I made was to use buttermilk powder and water for the liquid. The taste and texture were fabulous! The dough was so soft and pillowy. I will say I ended up making a second batch because I only got 3 biscuits out of my first batch. Left them in the fridge until the hubs got up. Also, my oven has an issue getting to the right temperature so I baked them on convection for the full 15 mins. I am a pretty good cook but have never been able to make good biscuits but these turned out super fantastic! Very excited to have a go-to biscuit recipe for biscuits & gravy!
I love that these turned out so great for you, Marcy! Thank you so much for making them!!
Still making these biscuits, perfect recipe for 2 people for weekend breakfast. Especially with my amazing sausage gravy.
I’m so glad you’ve been enjoying them, Laura! Thank you so much for making them!!
I made the small batch as the recipe is shown and didn’t modify anything. I put my butter and milk in the freezer for about 30 minutes to get them nice and cold and used the grater method for the butter. The biscuits turned out fantastic and tasted just like my mamaw’s and my mom’s biscuits who are both deep Appalachian souls. The only thing I didn’t do was use parchment paper because I was raised on cast iron. 🙂 I never really paid attention to my elder’s recipes for biscuits because they literally just whipped them up and measured by eye and love. Of course I ate these with sausage gravy. This is an excellent recipe for when you need a few biscuits. Great job to the creator.
My powder was over a year old – thinking that’s why they didn’t rise much – but not sure
That could be it! You can test your baking powder by adding about 1/2 teaspoon to a heat-proof measuring cup, then pouring 1/4 cup boiling (or super hot) water over it … it should start to bubble and fizz if it’s still good!